Tuesday, September 26, 2023

Makin' Bacon

 Have you ever bought the "thick cut" bacon at the store, and thought that the people doing the cutting of the bacon should really consult you on what an appropriate thickness is?  I sure have.  I want something that I can put my teeth into and know that it's got some meat to it!  Bearing in mind that my goal here is to have amazing results with minimal effort, I started searching around online, and I found this video.  I followed the directions exactly, and I got delicious results!


I got a nice piece of uncured pork belly from Costco just down the street.

I have kosher salt, brown sugar, and curing salt.


I cut the pork in two pieces to make it easier to handle.  Since the curing rub is a ratio of the meat weight, I weight both pieces separately.  Yeah, the weight is on the label on the bag.  I got toys that need to be gotten out, like the food scale.  I weighed in grams for a more exact measurement.


For salt and sugar, I want 2% of the total weight.  If it's been a minute since you took math, I took the total and multiplied by .02.  I need just over 76 grams of salt and 76 grams of brown sugar.


I measured kosher salt, hit the tare button to re-zero the scale, and then the brown sugar.


For the curing salt, I need .25% of the total weight.

That's the total weight multiplied by .0025.


Turns out I needed a larger bowl to mix this stuff.  Next time 'round, I'll measure the cure for each piece separately.

Coat each piece top and bottom with the cure mixture, and then pack 'em up.  The video suggested two-gallon ziploc bags.  I used the vacuum sealer because I was worried about leakage.  Into the fridge they go for seven days.


...Seven days later...

Look at the difference in color!


Unpacked and rinsed completely, to get the excess cure mix off the meat, and patted dry.

I added pepper hoping for a nice crust.  I'll need to add more than this, next time.


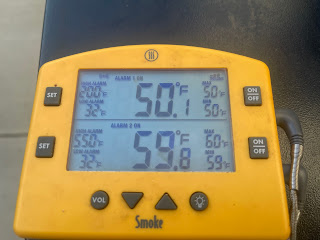
On to the trusty Traeger at 225*F.  Heat probes set to alarm at 145*F.


Pulled off the smoker, and set in the fridge stark naked to cool.  I want it firm enough to slice, and it'll be too wiggly when warm.


The moments of truth!  Time to slice and taste!


So...those pieces were too long, and apparently my pan is wayyyy hotter in the middle.  I meeeeean...I ate them, because it's bacon.  Pictured here with "thick cut" bacon from the grocery.  We had to try them at the same time.  For science.


Oh, well.  I diced up the stuff I'd trimmed off the sides and made an omelet, and I was just fine.


So, I cut the piece I was cutting strips from in half.  MUCH better results.


So...I had breakfast for dinner.


The whole point of The Illusion of Sophistication is that you can have fantastic results with minimal effort.  Prepping the pork belly took MAYbe twenty minutes.  A week later, it was on the smoker for about two hours while I napped.  When you do the math, I ended up with some killer bacon for just over $3.00 per pound.


Next time, I'll run the smoker at 180*F and probably end up going closer to three hours (depending on how fast the meat comes up to temp), because I'd like a more intense smoke flavor.  I'll measure the cure mix for each piece of meat separately for more precision.


Wednesday, September 20, 2023

 Mid-Week Meat Sauce


It's the middle of the week.  You're kinda tired and crabby.  You want comfort food.  Sure, you can grab a jar of that sauce in the pantry.  Or...OR...you can make your own.  Like this:


Total prep time 15 minutes/Total cook time 30 minutes

1 ground beef

1 pound mild sausage

about 2/3 of an onion, because it was already in the fridge that way

fresh garlic

fresh basil

home-made seasoning mix.  

I love the blend from Our Best Bites (I double the recipe and pre-make this stuff and just have it in the door of the fridge)(I put it on fish when I'm doing a quick sautee in butter for lunch during the week.)


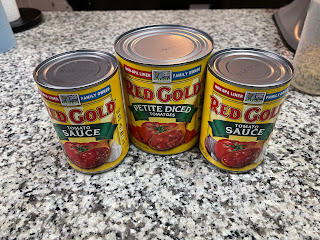
You'll want petite diced tomatoes, and tomato sauce.  Red Gold is an Indiana company, and once you've had it, it'll be difficult to go back to other brands.


Gotta have pasta.  I THOUGHT I was having spaghetti.  This is what was in the pantry.


Dice up your onions, garlic, and basil.  


I'm using a small dutch oven (or stew pot?  not really sure).  This is probably about 2 Tablespoons of extra-virgin olive oil.  (You can't make a living nativity scene in central Indiana because nobody can find three wise men or a virgin).


I want to soften and carmelize the onions and garlic.  I did a couple cranks of pepper from my pepper grinder.  I'll add the basil later.  I don't want it to cook too much.


Once I've got the onions and garlic the way I want, I'll add the meat and brown it.


Unless you're buying super-lean ground beef and sausage, you'll probably want to drain the grease before you continue.


I added 2 Tablespoons of that seasoning blend I mentioned above, and about half the basil.  Stirred that in, brought it back to just a bit of a bubble.


And plated, with a little more basil on top 'cause I'm fancy like that.


Monday, September 18, 2023

Smash Burger Quesadillas.

 Today we're making Smash Burger Quesadillas.  Because why not?  I saw something similar on a YouTube video, so I'm giving it my own spin.  Prep time was MAYbe 15 minutes.  Cook time MAYbe another 15.  This was fast, easy, and very inexpensive.


We're starting with a pack of fresh tortillas, a pound of ground beef, about 1/3 of a large onion, some cheese from several bags that were in the bottom of the fridge (too much to throw away but not enough to use), and freshly chopped chives from my garden. Tonight we're using Blackstone's Street Taco seasoning. 


I've divided the ground beef into five nearly-equal sized portions, because I have ten tortillas in that bag and I don't want to put away just two of them.

Once the Blackstone is at medium heat and oiled up, I dropped the diced onion into approximately equal-sized piles.  Love that sizzle!


I flattened the ground beef on top of the onions.  The onions are going to be crushed into the meat, and they'll steam until soft under there.  I very lightly sprinkled some of the Blackstone Street Taco seasoning.  I could have gone a bit heavier, but I wasn't sure how powerful it was going to be.

I added cheese and a tortilla to each pile of meaty-oniony goodness.

Here's the initial flip.  I'll use a higher heat next time; I wanted a crisper Maillard reaction, and a higher temp would have done that.  I was being cautious, since this is a first try making these.


I went back in the house for more cheese.  I sprinkled a little bit of my chives on there, just for fun. 

After adding the second tortilla, I gave a flip to help melt the cheese on the other side.  I should have added a bit more oil underneath when I turned them.

These turned out great and plated up nicely!

I dipped mine in sour cream. I'll have a little Cholula Sauce next time.


Takeaways from today:

Higher heat next time, and a little longer on the first turn.

Add more oil to the surface when turning to help get a more even color on the tortilla.


Adaptations:

This would work pretty well in cast-iron inside.  I'm thinking of trying it with diced chicken.  I know a lot of people would add fajita veggies in the initial onion drop.  This would pair well with salsa, guacamole, and just about whatever else.


Saturday, September 2, 2023

 Hi there!  Welcome to "The Illusion of Sophistication," the blog about food that tastes like it was harder to make than it really was.


Today: beef tri-tip kebabs with pineapple and red onion.  Total prep time 30 minutes.  Cook time 1.5 hours on the smoker, 8 minutes on the grill.

Marinade

1/2 cup extra-virgin olive oil

1/4 cup each Worcestershire sauce and soy sauce

3T teriyaki glaze

about 8 cloves garlic, minced.

Beef 

this was a beef tri-tip, about 2.5 lbs, heavily seasoned with Blackstone brand Steak Seasoning.

Other stuff

1 fresh pineapple, cut up

1 red onion, cut up.

1 bag Uncle Ben's 90-second microwave brown rice


Today I did my prep outside.  The tri-tip is on the smoker.

Pulled the tri-tip off the smoker at 120*F.  I'm going to grill the kebabs and I don't want the meat overdone.

I've got everything ready for the grill. 

Grilled with indirect heat at 450*F for five minutes on one side and three minutes on the other.

Plated!